Ever notice that sometimes there’s an unsightly line on the leg or arm of a Gunpla where two pieces meet? That’s called a seam line, and it happens when pieces don’t quite line up as evenly as you want them to. But it can be fixed! Meet Henry, our newest contributor to Gunpla 101. Today, Henry is walking us through seam line removal 101 using the HG Barbatos Lupus.
As I’ve been building over the last year, I’ve come to be familiar with some elements of Bandai’s engineering, especially on their High Grade line and some early Master Grades.
One of these is seam lines.
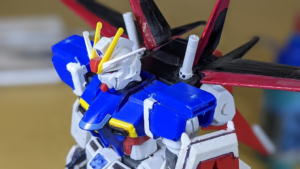
 While Bandai is usually good at putting these in areas of the kit you wouldn’t see when looking at the model straight on, occasionally the design of the unit, as seen here on the arm of the HG Gundam Barbatos Lupus, will necessitate that these seam lines are front and center.
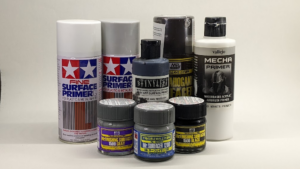
To combat this, I use the following tools:
- Tamiya Cement
- Metal file (low-grit sandpaper is fine, too)
- Scotch tape
While some modelers will advocate hobby putty for dealing with seam lines, I much prefer modeling cement. Putty requires extra paintwork, while cement can be used for many different purposes such as repairing breakages without risk of damaging the plastic. It can be used in scratch building to add fine detail to your kits.
 Tamiya Cement comes in three varieties. I personally have only used the normal version, but there is an extra thin variety and a quick drying type. The metal file can be switched for sandpaper of various grades according to preference, and the Scotch tape I use to hold parts into place while the cement dries.

 Get started by taking apart the pieces you intend to cover the seam of.
 Tamiya’s cement comes with a capillary brush on the lid, making it easy to apply. You’ll notice right away after taking the top off this solution has a distinct smell to it. You’ll want to open a window!
Simply by dabbing the brush on the inside of the container, you should have enough cement on your brush. Remember, as long as the stuff doesn’t drip, you’re using enough.
 Apply your cement to each part of the seam line by brushing it. You’ll want to continue to top up your brush with the cement after each application.
 After this, apply strong pressure to both sides of the seam line with your fingers. The excess cement will come out of either side of the seam line, beginning the bonding process. Keep applying pressure with your fingers. Plastic cement works by slightly melting the plastic, then drying it, bonding both parts together. This is why excess pools out. Oh, and I hope you kept that window open. The plastic melting will definitely produce a stronger smell than before.
 This is an optional step, as squarer parts such as shoulders will be easy enough to keep hold of and apply pressure to as time goes on, but if you’d like to free up the next 30-60 minutes, you can use Scotch tape to keep your parts kept together instead of your fingers. Wrap the tape around the parts tightly.


When you’re ready, and the cement has dried, remove your Scotch tape and inspect the part. You may notice in some cases that they are misaligned and one part is higher than the other. To fix this overhang, use your file (or sandpaper) to shave away the excess until it’s equal. You’ll also want to use your knife to scrape away the excess glue around the seam lines. Be careful not to cut too deep into the plastic. Don’t worry about making a mess; you can spend as much time on cleanup as you want, after all.
 Observe your results! In this particular project, I had assembled, panel lined, and painted details on my Lupus’s arms before doing something about the seam lines, which has lead to the paint and the lines coming off. It’s better to cover seam lines beforehand. More experience for next time!


5 Comments.
Excellent work~ I always find seamlines a problem to deal with for kits. The extra thin cement works wonders for this too as it seals it away in a relatively smaller time frame. If you dab just right you can also have the seam lines merge without seeing any of the plastic or glue coming out. Its more advanced but its how alot of pros put together some PG and MG after painting them. Keep up the good work!
I’m still new to gunplay building, but wouldn’t it be better to apply the cement before paint?
About 99% of the time it is better to apply before painting. However depending on how the parts work together and how it functions on the kit you may want to do it afterwards, its a very advanced technique know where and how much to apply to make it not go over the paint job.
awww alright, thanks for the reply!
Great advice! I just built my first two gundams and I have lots of stress marks and misaligned pannels on them. Vidar might not have been a great starter :/ Do gundam bases usually sell these glues and paints?