![]()
The White Devil. The Red Comet. Color is a huge part of what gives each Gunpla its distinct look. And it’s easier to swap a kit’s color scheme than you’d think.
This summer, I completed my first ever custom color scheme for a Gunpla project. Inspired by the vibrant protests across the United States, I decided to paint a Char’s Z’Gok that I had available in the colors of the transgender pride flag. In the process, I realized that it isn’t too difficult to create the custom Gunpla paint job of your dreams. Follow along to learn how I gave my Z’Gok a completely different look—and how you can, too.
This extremely belated tutorial began as a Twitter thread. If you’d like to read that to see how I underwent this process in real time, feel free to do so here.
Gather your materials
For this project, I needed the following materials:
- HGUC MSM 07S Char’s Z’Gok
- Tamiya Spray Paint Coral Blue (TS-41)
- Tamiya Spray Paint Pink (TS-25)
- Tamiya Spray Paint White (TS-7)
- Tamiya Fine Surface Primer White (TAM87044)
- Mr. Super Clear Semi-Gloss Spray
- Plastic spoons, for testing paint
- Painting sticks and painting stand
- Nippers and hobby knife
- Sandpaper, 120-220 grit
I chose to use Tamiya spray paint for this project because I already had two of the colors I wanted to use. I bought the pink and blue during a hobby store sale a few years ago. I used lacquer paint, which meant I needed to use a lacquer primer, so I opted for the same brand.
Do a straight build
A “straight build” is what we call it when you build a Gunpla right out of the box with no paint, no panel lining, no customization of any kind. The purpose of doing a straight build here was to get familiar with the kit and see how everything fits together. Since I wanted to paint the Gunpla parts separately, the straight build showed me which parts would be visible (and which would be completely hidden, so I didn’t waste my time).
If I were painting a more complex kit, I might have skipped this first build. But the HG Z’Gok only has 20 steps, so it was worth taking a little extra time to get comfortable with the build.
Sand and smooth
At the same time that I was doing this initial build, I was sanding the kit within an inch of its life with fine-grit automotive sandpaper. This is ideal for removing any raised bumps, no matter how small, leftover from when I cut the pieces out of the sprues with nippers.
However, as effective as automotive sandpaper is at smoothing down a kit, it sure doesn’t make it look good. It removes the sheen on the plastic which allows kits to look attractive in a straight build. It can also add scuffs and even stress marks to your plastic parts, so you pretty much have to paint (or at least topcoat) once you sand. This is going to be the worst-looking step of the process, but at least you’ll be able to immediately feel how smooth it is!
Want it to be even smoother? Remove seam lines between parts that don’t quite match up. Read our seam lines tutorial to learn how to do this with Tamiya cement.
Choose your colors
Now comes the fun part: setting up your custom color scheme. In order to visualize mine, I found the Char Z’Gok line art in a Google image search. If you’re having trouble finding it, I recommend checking MAHQ, a great resource for quickly locating the stats on any mobile suit from the Gundam multiverse (or a dozen other mecha anime). I imported the line art to the free Photoshop-clone Gimp and started filling in the blanks.
As you can see, this is not rocket science. It’s not even a huge change. It’s mostly just this: I decided to make the maroon parts blue, the salmon parts pink and the gray parts white. Though it’s simple, I was able to quickly and cheaply figure out whether I was committed to the custom color idea I had in my head. Putting it in a visual layout made it more real.
Test your paint and primer
Once I was certain of my layout, I tested to make sure my primer and paint would give me the look I was envisioning. For this step, I used plastic spoons leftover from takeout food. This didn’t only show me how it’s going to look but helped me practice the technique I wanted to use to get a consistent finish before I tried painting the real thing.
When I primed and painted my plastic spoons, I made sure to be aware of how distant I was holding the spray can from the spoon. For my first spoon, I sprayed too close and got bubbles. I also tested how many coats of paint I wanted to use to get the opacity I envisioned. Above is the set of spoons that matched my internal vision most closely. It’s two coats of paint over two coats of primer, and I painted them from about a foot away.

Prep for priming
After I decided I liked how the spoons looked and felt like I’d practiced enough to be comfortable, it was time to spray the actual Gunpla parts. I took my kit apart for priming and divided the pieces by which color paint they’d need.
Next, I cleaned the pieces for painting. The natural oil on your fingertips can keep paint from sticking to plastic, so it’s a good idea to wash your Gunpla parts first. I just used a few drops of dish soap in a small tub of water to make sure my parts were oil-free.
Dried primer and paint can add heft that slightly changes the shape and size of a piece, which means that paint on connector joints can make it difficult to fit pieces back together. In order to avoid that, I taped over the connector parts using thin Tamiya tape. For connectors that carry a heavy load (like the leg and torso connectors), I removed the piece entirely and opted not to paint it—to get paint on a part that is integral to the kit’s movement would risk compromising poseability later, so some of this kit’s internal parts are still their original dark gray.
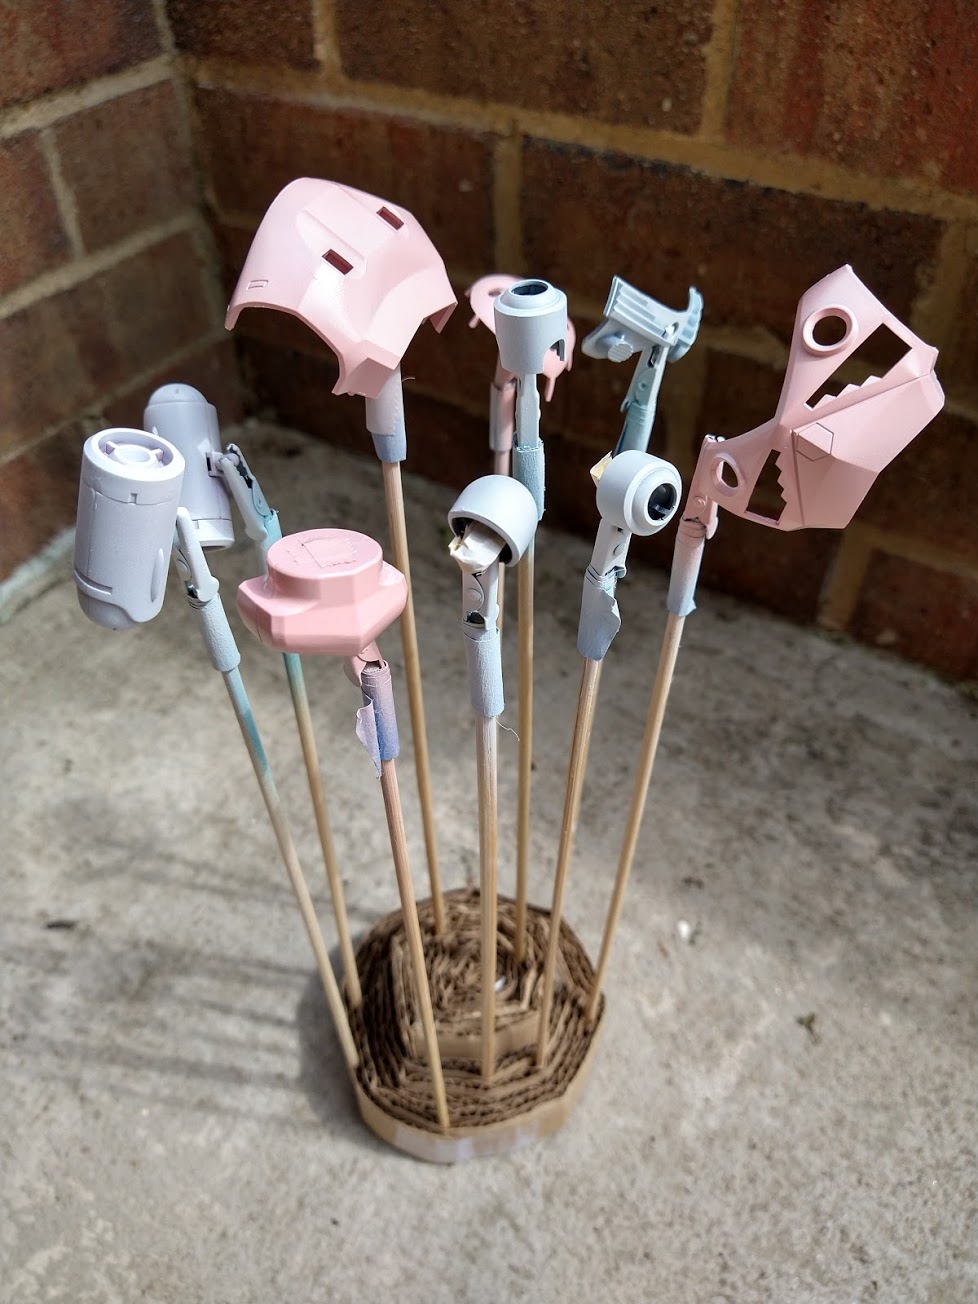
Finally, I put the cleaned and taped parts on painting sticks. If you’re wondering how I made these sticks (out of alligator clips and bamboo skewers), I wrote about it in my metallic paint marker for Gunpla tutorial.
Prime and paint
Once your pieces are secured on skewers, it’s time to paint. Since spray cans are messy and emit strong fumes, you’ll need somewhere safe to use them. If you’re working indoors, you’ll want a spray booth to contain both the fumes and the mess. However, it’s a lot cheaper if you can work outdoors, so that’s what I’ve been doing for years. You don’t need to have a yard to do this—I don’t. You can use a parking lot or another common area.
However, you will need to have some kind of surface to paint over, so you don’t mess up the lawn or pavement. I used a shallow cardboard box lined with newsprint. Between each painting session, I could turn the page and use a fresh piece of newspaper each time the paper got too saturated with paint. At the end, I threw out the newsprint and the cardboard box underneath was still usable and fume-free, ready for the next painting project.
As for the actual spray painting process, I turned to Gunpla 101 contributor Emily for advice. She reminded me that it’s better to spray from a distance, in a wide arc. “Spray across the part back and forth, turning gently. Never start or finish spraying on the piece itself,” she said.
I used a white primer for this project because I love the way light colors pop on a white background. However, if I were to redo this project, I’d use a gray primer instead. That’s because I found out that it takes a lot of coats of white primer to conceal darker colors like maroon, salmon, and dark gray. I’d planned to use only two coats of white primer, but I ended up having to use three coats to fully hide the original colors.
I painted each of the three coats of primer with 20 minutes in between. (I might have only waited for 15 in a drier climate, but we had a humid summer.) Once I was satisfied with the coverage, I dried the primed parts on sticks for 24 hours. Then, I painted two coats of pink, blue, or white paint on top depending on the part, dividing them in batches based on color.

I made one last-minute change to my color scheme at the end. I ran out of blue paint and I didn’t want to buy more, so I had an idea to get creative with the Z’Gok’s backpack. As Marc pointed out in his gradient painting tutorial, when a spraycan is about to run out, it starts releasing paint unevenly. I decided to look at this as a feature and not a bug. I painted the backpack pink, and then sprayed my near-empty blue can over it to create a splatter effect.
Don’t forget to topcoat
Once I was happy with the smoothness and intensity of the paint, it was time to seal it in with a clear topcoat. A layer of topcoat protects your paint job and gives it a more polished look at the same time. You can choose between matte, gloss, or semi-gloss in order to give the kit different effects, too. I chose semi-gloss for a hint of shine over the cheery bright colors I chose.
Even though it goes on clear, the topcoat process is very similar to painting. Spray from a distance in order to avoid an uneven finish. Spray back and forth and never start or stop spraying on top of the part—otherwise, the paint could collect and drip down the piece. Make sure to cover the entire piece to avoid noticeable differences in its finish.
That said, I didn’t fully take my Gunpla apart in order to topcoat it. I top-coated the head and torso, the backpack, and each arm and each leg as a unit.
Put it all together
After at least 24 hours of drying, it’s finally time to assemble the pieces for the last time and admire the finished product. Even though I didn’t customize anything but the colors, it’s a dramatically different look for the Z’Gok. It’s amazing to me that this is the only Z’Gok with this color scheme in existence because I came up with it myself. Why not dream up a new custom color scheme and paint your own unique Gunpla, too?
Discover more from Gunpla 101
Subscribe to get the latest posts sent to your email.


3 Comments.
Looks awesome and the color scheme hits close to home since I’m a trans builder. The content of this site is awesome! Keep it up!
Thanks, so glad you like it! Let me know if you end up painting something similar.
Will do! I tried to with a MomoKapool, but the paint wasn’t working out quite right, but it is a project I would like to try in the future!