
The MSN-04 Sazabi is Char Aznable’s most formidable mobile suit. With a powerhouse body frame beneath the trademark red coloring, it’s intimidatingly built. It’s no wonder this Gundam franchise classic has joined the Real Grade line, but how does the RG Sazabi model kit hold up? Our newest contributor, Dominic of Total Gunpla, takes it for a spin.
First Impressions
Before we had the RG Sazabi, we had the MG Sazabi Ver. Ka. It was an iconic design realized with an unprecedented level of detail, articulation, and stability, all in the 1/100 scale. Now, five years later, the Sazabi is reborn into the RG 1/144 line. I immediately bought one because I wanted to know one thing: does this version hold up to its bigger cousin?
I was already on board by virtue of it being a Sazabi. The Sazabi is one of the most iconic Gundam designs of all time. This behemoth towers over your average mobile suit. It’s incredibly powerful but exudes a certain grace: imagine a ballet dancer turned crime fighter.

As with all RG models, I expected accurately-colored parts, incredible detail with plenty of frame poking through the armor, mechanical details that make it more poseable, and stickers. Generally, I got what I was expecting.
Design and Colors
The rounded surfaces, mono-eye, bulky frame, and power pipes immediately mark this as a Zeon design. Every part of this MS is big and ornate; it’s like a peacock, demanding attention. At the same time, it just looks menacing which, combined with its sheer size, makes it all kinds of intimidating. Very fitting for Char’s ultimate MS, designed to take names and look good while doing it.
Regarding the colors, it’s a Char MS: can I leave it at that? This is a big red beast with a few black and yellow highlights. It’s a classic color scheme that really suits the Sazabi, but we have seen it a fair number of times already in Char’s previous mobile suits.
There’s more variety to the color than meets the eye. There are three shades, labeled as Side Armour Red (SAR), Shield Red (SR) and Front Armour Red (FAR). SAR and SR are the predominant colors, being deep reds and the colors most associated with the Sazabi. They are very similar: I thought they were the same shade until I read the color guide in the manual. Meanwhile, FAR is distinct from the other reds, closer to pink. It helps break up the big red pieces and is a welcome addition to the color scheme.
Overall, this is a great looking kit fresh out of the box, and if you want to go further, a great canvas onto which you can put your own twist.

Difficulty
There are about as many parts to the Sazabi as most RG kits, but because they are bigger parts than on other RG kits I’ve built, it feels easier to put together and handle than most of its siblings. All RG kits will have a few obnoxiously small pieces, but for Sazabi, the only one that comes to mind is the hinge which allows the head to split. It’s small but manageable, and unlikely to fly off into the void as you’re prepping it.
There are, however, parts, that you should pay extra attention to:
- Parts A13 and A14, movable black armor panels on the backpack. You need to insert a portion of each of these pieces into a chamber in the frame and then twist them 90 degrees downwards to get them in place. If you’re not careful, it is quite possible to break them if the joint isn’t fitted into the correct position within the chamber. Grip the pieces as close to the joint as possible and rotate slowly.

- Fitting the clear forehead gem (A10) into the antennae piece (C13). The fitting is tight on these pieces, and A10 needs to go in at a specific angle; it’s made more difficult as A10 is a clear part so it’s hard to tell if you have it lined up. The danger during this step is not to A10, but to C13, as it’s hard to grip and has those delicate antennae. Just take this stage slow and you will get it.

- H20, H23, and H24: the shoulder joints that sit within the torso. These parts go together at very specific orientations and are very tight. If you push them together when they aren’t lined up correctly, it’s really easy to break your shoulders! Again, take this stage real slow and work with a bright light, checking orientation at every step.

- Connecting H24 to G26, which join the shoulder joint to the torso. I found this connection incredibly tight and have read of other modelers breaking the piece. For my own model, I put a little Vaseline in the connection to ease installation and articulation. I highly recommend you do this or sand the connection down a little.

- If you’re planning to disassemble your kit later, leave off the red armor on the back of the knee (F12) and the black armor on the backpack center (A18). These pieces have little tabs which make it hard to remove (though not impossible) once installed.
Articulation
Right off the bat, you’ll notice that the finished Sazabi is back-heavy and will have trouble posing on the ground. Either get a 1/144 model kit stand (it doesn’t come with one) or prepare to play the balancing game.
Without accessories, the articulation is superb. We’ve got full 180-degree bends on the elbows, 150-degree on the knees, leg to hip connections and movable skirts armor that allows the knee armor to touch the tip of the chest; separate toe, ankle, midfoot, and heel articulation points, etc.
As long as Sazabi doesn’t fall over, you can get it into any pose you could want.

Extras
Sazabi comes with the beam tomahawk, two beam sabers, rifle, 6 funnels, and shield; all of which are molded with a lot of detail and look great.
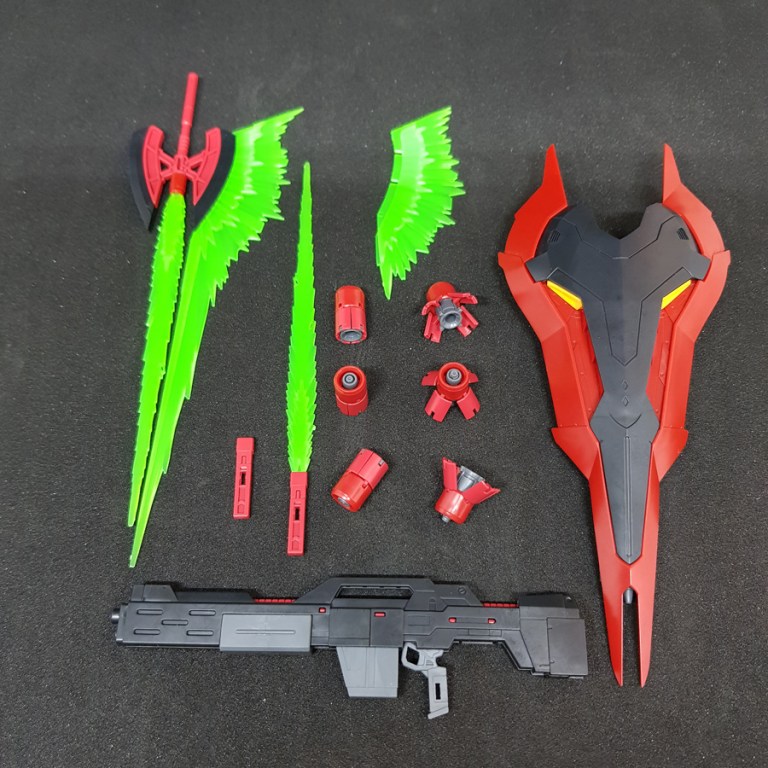 The beam tomahawk, sabers, and rifle don’t hinder posing in any way and offer some of the coolest poses as they don’t get blocked by the armor, have a really cool mold, and come in a brilliant clear green.
To pose the rifle, you will need to use the extending forearm gimmick Bandai designed specifically to accommodate the rifle stock. Using this extension, you can achieve any gun pose you want. It’s a sweet gimmick and I’ve never seen it on any other model!
The six bits are fully transformable, just like in the MG Sazabi Ver. Ka, but there is no stand to display them in flight. If you want to display them then you will either need to make your own display using plastic rods, or wait for the inevitable P-Bandai set.
The shield can be tricky to pose as the method of connection does limit where it can move and you will find it blocked by the rest of the model in most poses. On a positive, the joints are strong enough to support the shield and tomahawk outstretched, which is really impressive as it’s a heavy combo. It’s been like this for 24 hours now without dipping!
Finally, there are a pair of melee weapon hands, reaching hands, and a pair of closed fists; a single right-handed trigger hand for the rifle; a piece to connect to an action base; and a 1/144 Char Aznable figure looking sharp in his Neo Zeon Uniform.

Final Thoughts
After a decade of Gundaming and over 50 kits, I can confidently say the RG Sazabi is among my top 10 best Gunpla kits ever made. Amazing aesthetics and engineering—and, most importantly, it is really fun to build and pose.
Unless you have a crippling fear of the color red, you should get the RG Sazabi. You will love it!
 About the contributor: Dominic got his start in Gunpla with a 1/100 Destiny Gundam way back in 2006. At the moment he’s experimenting with new techniques to create models that make people put down their phones and say “That is awesome, I want to make one!” The journey is covered on his blog, TotalGunpla.com.
Discover more from Gunpla 101
Subscribe to get the latest posts sent to your email.


