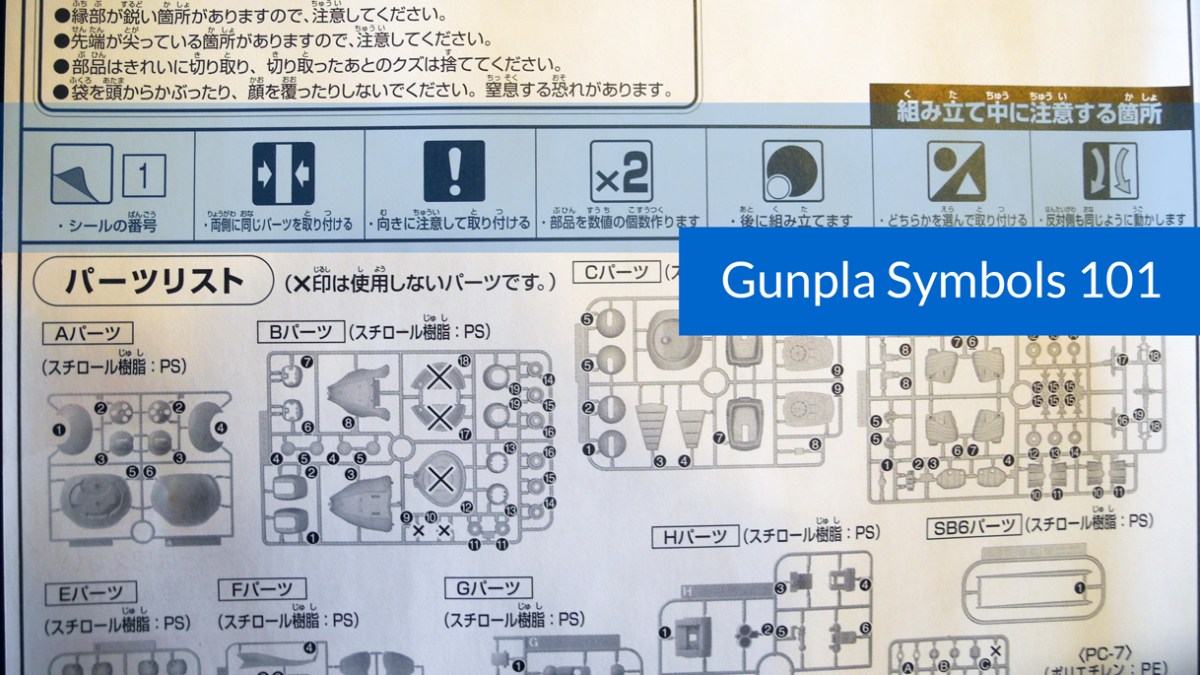
Bandai model kits are written entirely in Japanese, but you don’t need to be able to read the language in order to enjoy Gunpla.
In fact, the language of Gunpla is nearly universal. Instructions are told through detailed images, numbered steps, and symbols.
The symbols are pictograms in their own right and you might be able to figure them out on your own. But if you’d like the definitive English translation, we’ve put it together here. Follow the numbers to figure out the corresponding symbol meaning:
1. Decal number. The rectangle with a flapped corner does resemble a sticker, doesn’t it? The (1) next to it indicates that the stickers in this kit are numbered, and in this case we’d use Sticker 1. Sometimes stickers are lettered A, B, C…
2. Symmetrical parts to be installed. Like most humanoids, Gunpla are symmetrical. When you see this symbol, you know that there is a corresponding similar part to the one you are currently working with, to be installed on the opposite side.
3. Pay attention! This means the part you are working with may have some subtle definition that will mean its orientation and direction upon installation are very important. Look at the corresponding picture of the part very carefully.
4. Repeat this step two times. Because of Gunpla symmetry, they tend to have two arms, two legs, etc. If you’re building an arm and see this symbol, you can rest assured that another arm is on its way, assembled with identical steps to the ones you’re following now.
5. Connect this part last. Sometimes it’s much easier to install Gunpla parts in a certain order due to their shape once connected. When you see this symbol, it means you’ll get the best result if you attach this part as the last step of the task.
6. Your choice. Sometimes kits come with a lot of accessories, more than the Gunpla can hold. This means there are multiple options for which of the parts you want to install. You’ll often see this on a Gunpla that comes with multiple hand orientations (designed to hold different kinds of weapons).
7. Opposite side will move in the same direction. Not sure if you accidentally swapped the feet for the left and right legs? If you see this symbol, don’t worry! It means the part will behave the same no matter which side it’s on.
Thanks to Mech9, which we referenced for some of the trickier translations!


24 Comments.
Wow, this morning I was just thinking how id like to see a new Gunpla 101 post! Arigato Lauren, and keep up the great work! 😉
@Kai, if you think that’s cool, check out the new shop I built!
There are other symbols aside from the few you mentioned. I happened to see them on my RG assembly manual. Take icon #5, for example. I saw a similar icon of reverse colors on my RG kit. The other two I saw were a symbol showing side cutters, and one that has “90 (degrees)” on it. Care to shed light on those? 🙂
@Paul, the first one is easy! Icon #5 in reverse would be “Attach this part BEFORE the rest of the parts.” After doing a little research online, it looks like the 90 degrees one means “how much this part needs to be rotated once attached” and the side cutters indicate where to cut the part out of the sprue. Hope that helps!
on the manuel, there is an “X” on some of the parts, what does that mean?
@disqus_HsLeK7ock0:disqus great question! On the manual shown above, these are parts that will not be used for the completed model. This is a Bearguy, so in order to make it, Bandai simply added a few more components to a regular Acguy. As a result, the Acguy parts are still included in this kit, but we don’t need to use them. It just saves Bandai time and money without inconveniencing us.
Hey, I just built my first real grade and it turned out amazing. I scratched one part, but below is a picture of it.
Aww Guest, I wish you’d shared your name. Because that is one good-looking Fenice. Your cat thinks so, too!
This was actually me. I hadn’t created an account yet and that’s my cat Lilo for scale.
@disqus_7r11Ji7uwT:disqus awesome! Thanks for making an account =)
Sure is RG? I was completely unable to find a real grade fenice but there are HG, if you get it online please tell me where u found it
Um… I hate to break it to you but that’s not a Real Grade kit although it would be nice to have this as a RG kit. But that is the HGBF XXXG-01Wfr Wing Gundam Fenice Rinascita. But I do love the cat. =^w^=
Hello! I’m a beginner and this is the model that I want to purchase.
So is it hard to build it?
And is there anything else I might need other than the basic tools?
Thank you very much!
@luhuynh:disqus the Fenice? If it’s just a typical HG, I would just use the basic tools to put it together. Good luck!
I know how this is going to end. If you don’t understand me, cats like to throw things from the tables.
Sorry if there’s any mistakes, English is not my native language.
Any chance you can do a quick post on how to do decals? I just bought my first MG kit and I’ve never done one before.
@disqus_7r11Ji7uwT:disqus excellent suggestion! We’ll keep you posted =)
@disqus_7r11Ji7uwT:disqus you asked, we delivered! Here’s a tutorial on decals =) https://www.gunpla101.com/dry-transfer-decals-101/
Awesome, thank you so much. I’m going to definitely use it for the Epyon I’m building.
THANKS A LOT , I’m building my first gunpla and was really confuse about the Connect this part last symbol
my first ever gundam, MG gundam astray blue frame revise
Mech9.com has tons of Gunpla assembly guides on various grades which is useful for any Gunpla modeler who needs help in translating the kit-supplied Japanese assembly guide. Mech9 uses the scanned and translated guides from the Korean Gunpla site Dalong.net as reference. Both sites are very valuable online resources for all Gunpla modelers especially beginners.
This awesome! I was pretty sure I knew what some of them meant, but there were a few that I had no idea haha. Thanks for the info!
Im a begginer at this i just brought the unicorn gundam destroy mode version and the one in 0079 and can someone explain to me how do you build them