 If your Gunpla looks great and you’d like to build a backdrop to display it in, you may want to consider a diorama. Depicting natural and manmade backgrounds featured in the Gundam universe, dioramas are picking up speed in the competitive Gunpla world and are a gorgeous way to make even novice kits look special. Our new contributor, Emily, shows us how:
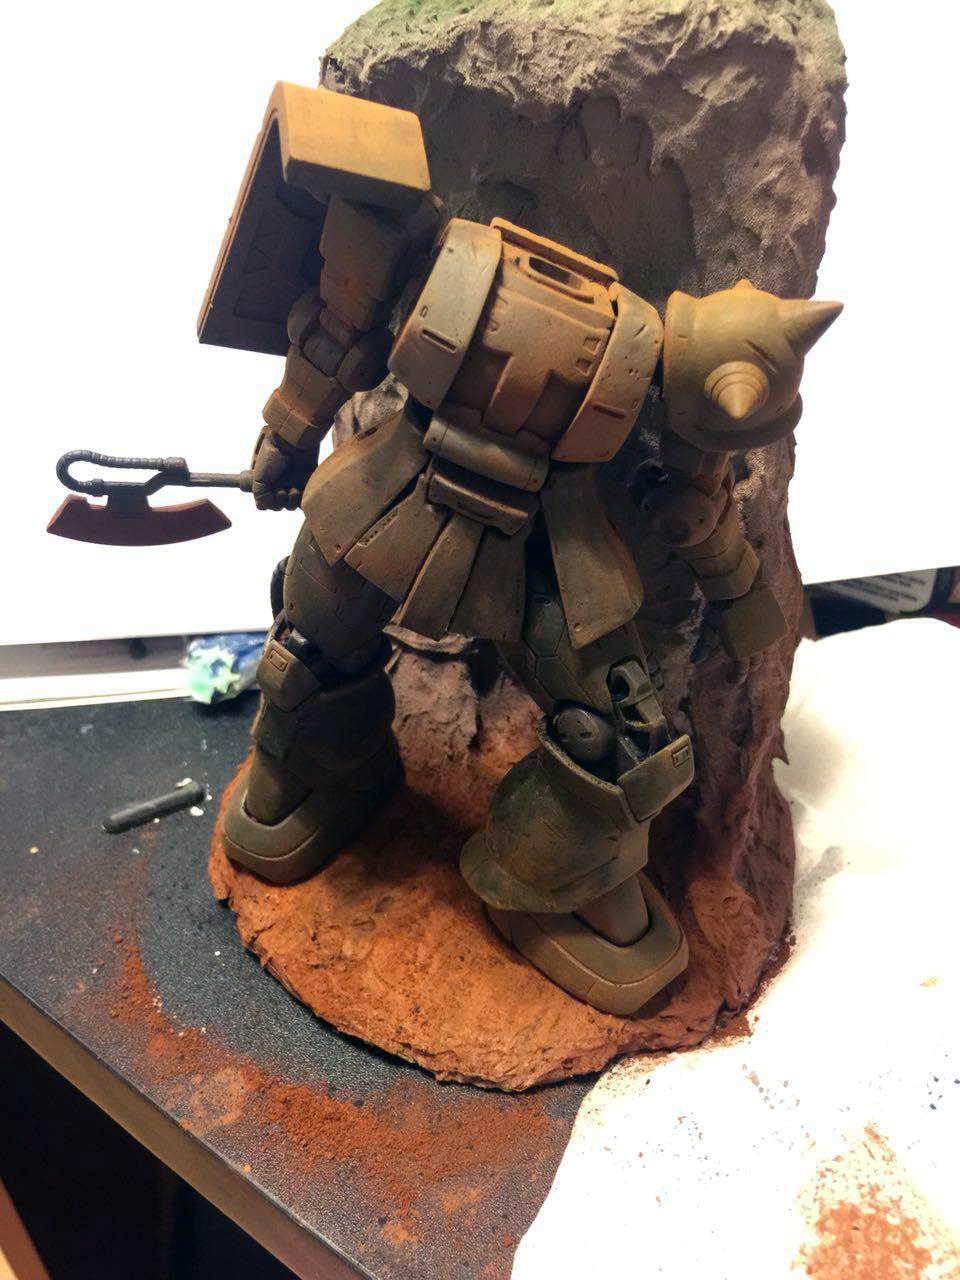
After I build a Gunpla model, I like to go the extra mile and display it in a diorama of my own making, too. It adds context to my models, showing how they look proportionate to terrain and featuring them in possible scenarios they might be used for.
In this tutorial, I’ll be showing you how I created one of my latest dioramas with the HGUC Origin Char’s Zaku II from start to finish.
1) Pick a setting and pose
Going into the project, I knew I wanted to have my Zaku hiding behind natural terrain mid-fight with an unseen enemy. I also have a fondness for the terrain of the American Southwest, so a mesa was a good fit. At some point I’d like to make a corresponding diorama with a Federation mobile suit, its pose and scenery suggesting a fight between it and this Zaku.
The process I’ll use to create this mesa is a versatile one. You can adapt it to work for most natural land formations including canyons and hills.
2) Gather your supplies
Here’s what I needed to build my mesa diorama. You can pick these up on Amazon, at your local hobby shop, and some of it can even be found at the grocery store.
Supply List:
- 80mm resin base
- 2mm gauge wire
- Kneadatite (Green Stuff)
- Aluminum foil
- Drywall joint compound
- Spray paint
- Weathering pigments

3) Determine your proportions
Before I began building my mesa, I had to figure out how tall I wanted it to be. I knew I wanted it to be big enough for my Zaku to hide behind. Once I knew how it should compare to the Gunpla, I measured the height of the kit while it was in the pose I was planning to use.
Once I chose the height, I added 3 inches to that measurement, and cut my wire to that height—I made it taller than I needed because it’s easier to cut off excess wire than it is to add more. I had to be very careful when cutting the wire, as the tip was be sharp enough to cut skin. I also needed to use a heavier duty clipper than I would normally use with model kit plastic.

4) Build the base wireframe
Now that I had my wire cut, I used pliers to bend the ends so that I could affix it the base. I used a 80mm resin base that I had laying around from tabletop gaming, but I could have easily used a wooden disc or unwanted CD as a base. To attach the wire to the base I used a bit of Green Stuff (the Kneadatite I mentioned in the supply list) to hold it down.
Once it finished drying, I could consider it safely affixed. From there, I used Green Stuff to connect the tops of the wires together and to cover the sharp ends. I then cut a smaller length of wire to add support in the middle.

5) Fill in your base frame
After the Green Stuff finished drying, I wrapped the wire structure and base in aluminum foil. It took about two layers of foil to give a nice basic skin.
Then I covered the aluminum foil in drywall compound. I didn’t take a picture because my hands are full, but it goes like this: while wearing painters’ gloves, you smear the compound onto the foil until it is covered. You need to apply the compound a little at a time: put some on, wait for it to dry, and then put more on. Once you have completely covered the foil in the compound, let it dry overnight. Once it’s dry it gives a nice natural landscape look, but keep in mind that it isn’t a toy—it’s still very fragile and prone to breaking.
6) Paint your terrain
Time to paint your diorama! I used three cans of spray paint, but you could achieve the same look with an airbrush or regular brush. I first covered it in a dark brown as a base coat, then sprayed a light coat of tan to give it some highlights. To finish it off I hit the top of the mesa with a bit of green to give the look of plant growth.
To finish the project off I used Terracotta Earth & Yellow Earth weathering pigments from Secret Weapon Miniatures on the base using a dedicated paint brush. This added texture and helped mimic the look of real plant growth on the top of the mesa. I also used these pigments on the Zaku itself, to help it blend into the scene. I added dirt to the legs and feet where it would naturally end up on the mobile suit while it walks through the environment.

Finally, I applied Testors plastic cement to weld the Zaku’s joints into my desired pose, and Gorilla Glue to affix it to the diorama base.
Dioramas can give your Gunpla an edge in competition or simply make them look a little more special while sitting on your shelf. Have you built a diorama before? We’d love to see it in the comments!
Emily has been building Gunpla for 17 years, you can see her latest builds and terrible anime opinions on Twitter. When she isn’t working at her regular job or building Gunpla, she hangs around the house with her three cats and husband Matt.
Discover more from Gunpla 101
Subscribe to get the latest posts sent to your email.


