
“This hand of mine glows with an awesome power! Its burning grip tells me to defeat you!”
G-Gundam fans will recognize this as the quote Domon Kasshu intones every time he uses his ultimate move, Shining Finger. Ever since I saw this comical, campy Gundam show, I’ve always thought that the Burning Gundam would look great with a glimmering paint job.
Since I’ve never painted before, I thought working with Gundam markers would be a perfect introduction to the process, and it was! In this tutorial, I’ll tell you how I turned my out-of-the-box HGFC 1/144 #110 G GUNDAM into the glowing “after” image you see above.
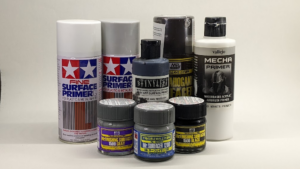
Gather your materials

I used more accessories for this build than I ever have before, but hey, that’s what happens when you paint. Aside from my kit, I needed my new Mr. Super Tool Set that I picked up from the Bluefin booth at Otakon. I mainly used the nippers, hobby knife, and file. Since I used minimal stickers for this kit (paint instead!) I didn’t really need my tweezers.

Here are the markers I used, the Gundam Metallic Marker Set. I only used the gold one this time around, but you can see how the others could be useful. Green, for example, could be used in place of the ubiquitous green eye sticker that comes with nearly every kit.

I also needed to apply—and remove—paint. Sometimes I used makeup brushes to apply paint, and I’ll explain more about that later. I especially liked using an angled eyeliner brush. It’s designed so you can see what you’re doing while you apply paint to your own eyelid, so I knew it’d give me the exacting precision I needed for painting tiny Gunpla pieces! I used Q-tips dipped in rubbing alcohol to remove paint if I made a mistake (and I also used them for panel lining as usual).

Finally, I got my top coat, skewers, and drying stand. Last time I told you about top-coating, I used a Styrofoam block as a drying stand, but it was bulky and hard to store. John made me this new stand by cutting the Amazon box all my tools came in into strips and rolling them into a tight ball. Now, I stick my skewers in the holes in the cardboard while my pieces dry.
Cut out pieces

Ordinarily when I build a Gunpla kit, I only cut out a few pieces at a time, usually no more than one step ahead in advance. Those steps can be complicated and deal with up to ten parts at a time. In order to keep from confusing different pieces, I try to only work with a few at once.
That all goes out the window for painting. Because I’ll want to paint pieces all at once, instead of one at a time as they come up, I take this step to cut out every piece I think I’m going to paint. That includes all the red, blue, and yellow pieces, plus a few white pieces (not shown). Gray is for the inner skeleton, so I’m not bothering with prepping any of those.

I cut out each piece with my nippers, being sure to leave a bit of nub…

Shave that nub down to nothing with my hobby knife…

And wrap it all up with the file. As we know from the top-coating tutorial, filing or sanding will leave streaky marks on the plastic even as it removes gritty imperfections. This means that I will have to use a top-coat as my last step, or risk having those marks on my final kit.
Prep for painting

Finally, all the pieces I think I am going to paint are cut out. Time to give them a bath!
Usually, you don’t need to wash your Gunpla parts before putting them together. That used to be the case in the ’80s and ’90s when imperfect kits may have had factory dust and other gross stuff on the sprues. Now, all I’m doing is washing off the oil from my fingers so the paint will stick.

I added a teaspoon of dish detergent to lukewarm water, dropped my pieces in, and gave it a couple swirls with my hand. Let that sit for about fifteen minutes and you’re done.

Don’t forget to dry your pieces throughly on a paper towel. Paint won’t stick to wet plastic any more than it’ll stick to oily plastic.
Time to paint

Finally, it’s painting time. First I started by painting pieces with flat planes by applying the metallic gold marker to them directly. To activate the marker, you push down against a hard (ideally, paper-toweled) surface until the paint begins to flow.
To get even coverage, you want to use as few layers of paint as possible, and to always paint in the same direction. If the paint is coming on too thick, you can also pump some onto a paper plate or similar surface (by pressing the marker tip up and down repeatedly) and mixing it with a little water.

The marker can apply paint in both big and small amounts, depending on which part of the marker tip you use. Here, I used the corner to apply tiny dots to the helmet.

When the surface was too textured for the marker, I coated a makeup brush with paint (by painting the brush with the marker) and then used the smaller paintbrush tip to apply paint into small spaces.

One thing I tried that didn’t work out so well was using Tamiya masking tape. I taped around the edges of where I wanted to paint, but the paint was so thick that it bled underneath the tape and made a mess. Next time I will either tape more securely or try another brand.

When I made a mistake, or the paint bled over like with the tape technique, I used a Q-tip dipped in rubbing alcohol to remove the excess paint.
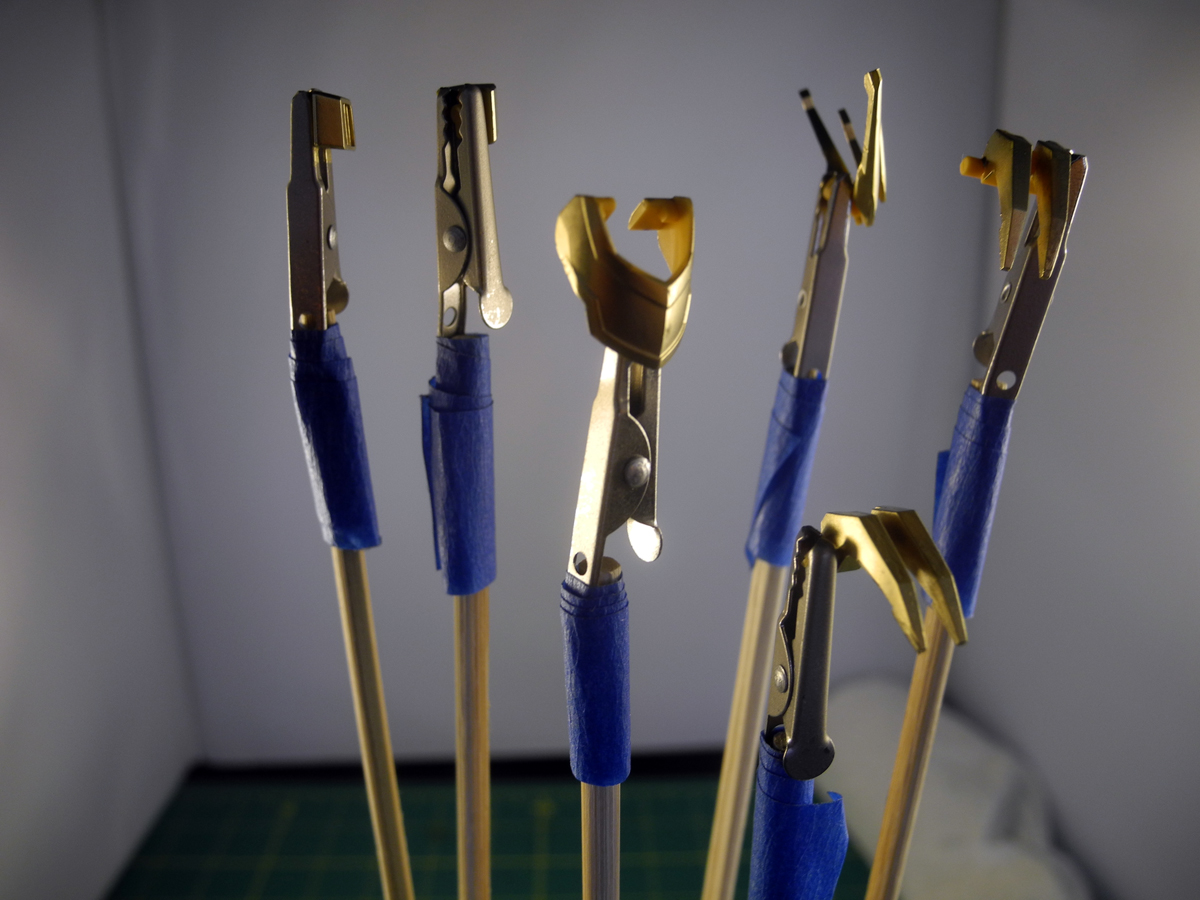
Finally, I put up painted pieces on alligator clips to dry. Here’s just the yellow (now gold) parts of the model. As you can see, there’s a lot of waiting around when it comes to painting a kit!
Assembly
Once everything was dry, it was time to see how it looked all together. I cut out the rest of the pieces that I didn’t paint, panel lined with a gray marker as necessary, and assembled.
(This is also the step where I realized I had lost a small but vital piece—the chin—and had to order a second kit on Amazon Prime to finish this.)

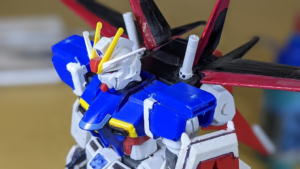
It took a little longer than expected, but Burning Gundam got built!
Notice that I did still use some of the stickers that came with the kit, most notably the eyes. I had a green metallic paint marker but not a black one, so I gave myself permission to stick with what I knew.
Top Coating
We’re not done yet. The filing left some scuffs on the plastic, and there are a few places where the metallic paint is uneven. Fortunately that’s nothing an even matte top coat won’t fix.

First, I took apart the kit and put each chunk on a different stick.

Next, I gave it an even coat with Mr. Super Clear. My t-shirt is very On Brand.
Then, more waiting around. It took about ten minutes to see the matte finish effect, but I waited three hours to reassemble.
Finish and pose
Finally done!

I took these photos in my light box with a piece of white poster board as a backdrop to get a completely white background. If you don’t want to buy a light box to get this effect, may I recommend Mario’s cardboard box tutorial?

You can tell here that I also added a matte finish to the clear orange hand, and it’s not so shiny anymore. The kit came with a bunch (and I had to buy a second kit) so I might replace that with an un-coated one.
So there you have it—my first metallic market painting attempt. There are absolutely imperfections if you look closely, but this is Gunpla 101—a place where it’s safe to experiment and have fun, even if it doesn’t end up worthy of the Gunpla Builders World Cup. I’m proud of myself for leaving my comfort zone and trying something new. I hope this tutorial encourages you to do the same.
Questions? Leave ’em in the comments!

5 Comments.
Great post! Every time I’ve thought of painting a kit I get discouraged thinking about all the supplies i’ll have to buy and the trial and error i’ll have to do in order to get it right. It never even occurred to me to scale back and start with something like painting markers. This might get me to give it a crack.
Glad to see you built a light box. The pictures look awesome!
I thought painting tape was mostly for use with spray painting. I wonder if bleeding/leaking happens with spray painting?
Heya~ For bleeding that your wondering about, it can possibly happen depending on how you prep your kits. if your doing multiple colors on one part, if you dont do a good coverage with masking tape. But the paint is thin enough most of the time it doesnt do that. Im actually working on a tutorial of my own for doing spray painting on my site might put on here if lauren would like it.
Great first attempt at painting! Im very impressed. One thing I would reccomend specially for kits with lots of shiny parts when your ready for a matt coat, you can either tape the shiny parts when you do a matt coat, or you can take them off and do a gloss coat. Cant wait to see your next kit.
Incredible goood! its awesome, i have the same markers, and i cant make a simple good layer with them…..
you like the metallic red of this markers? https://uploads.disquscdn.com/images/feb707d65fa27405962f0c3cc6ad1cf5a92cb6e3b3497debe9c2e6032886de13.jpg
[…] the way, I’ve been updating Gunpla 101 for a change. My painting tutorial is massive, took me two weeks, and includes about 20 photos of me working on every step of the […]